 Steller Solid Hardwood Floors are uniquely innovative, because we specially mill our planks so that they can be installed with our patented clip system instead of nails or glue. However, our planks are still made of real, solid hardwood. That means that they can be repaired like any other hardwood floor!
In this post, we talk about how to tell whether your flooring damage is a bad scratch or a dent - and we talk about how you can simply repair light scratches yourself!
Determining if the damage is a scratch or a dent
First and foremost, let's figure out what kind of damage we are dealing with!
Real wood floors generally have two types of damage, scratches or dents. And, sometimes, it is possible for the two types of damage to co-occur.
Scratches are tears in the polyurethane - the somewhat shiny, protective surface on top of the wood.
When this protective surface is torn, the wood underneath is exposed to the air, and the wood is no longer protected from water- no bueno.
This type of damage is usually caused by dragging sharp objects (like rocks in shoe tread) across the wood. Sometimes you'll even be able to see shiny slivers peeling up from the wood.
You can test whether it is a deep scratch by putting a drop of water on top of the wood. If it soaks in, and the wood turns a dark color quickly -- You've got a bad scratch!
Dents are indentations in the wood that represent compression of the natural wood cell structure.
This type of damage usually comes from the impact of a falling object, or the high pressure of speeding dog claws. Unfortunately, there's no good way to fix a dent besides sanding the plank (and usually the whole floor) down to the depth of the dent - and refinishing the floor.
However, modern materials can mean you might get lucky, and the protective polyurethane surface might still be intact - still protecting the wood from water - despite showing a dent.
Sometimes, if you drag furniture heavy enough, you can both dent and scratch your floor. As damages accumulate, the flooring becomes more vulnerable to wear over time - and compounds more easily - so its important to intervene early.
Unfortunately, with traditional floors, these types of damages can be really tricky to fix, because you often need to sand down below the polyurethane coat to fully and properly fix them. Sometimes that means removing a plank with a chisel and refinishing a small section - sometimes that means refinishing the whole floor.
Luckily, with a Steller Floor, Repairs are Easier than Ever Before
Instead of worrying about repairs or refinishing at all, with a Steller Floor you can simply hot swap a damaged plank with one in a less visible are in your room, like Lynn Johnson did with her Steller Floor in this story published by the Altoona Mirror:
"When Lynn Johnson dropped her computer and gashed a plank on her new hardwood floor, she swapped that plank with another one under the couch, and didn’t tell her husband. She could get away with it because the floor in her living room was built with materials manufactured and a system developed by Steller Floors."
Or, of course you can order a new plank from us.
What if I only have light scratches in my wood floor?
Above, I described two scenarios: bad scratches, and bad dents - but what if you have light scratches that haven't totally torn down to the wood yet? Great question!
Now is the perfect time to touch up your floor to prevent further damage!
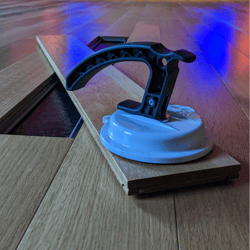
If you have simple, light wear & tear on your hardwood flooring, its very easy to repair - whether it is a traditional hardwood floor or a Steller Floor - Although with a Steller Floor, you could remove the plank with your handy suction cup, and set it on your table to work on 😉.
Some limitations to this advice: First, please try to limit the scope of this DIY project to areas less than six inches by six inches, a minimal number of adjacent planks, low traffic/low visibility areas. If the project is large, you should always consult a professional or reach out to our team at Steller Floors for advice!
Let's start by collecting your basic supplies from the hardware store. You'll need 180 grit sandpaper, water-based polyurethane in a matching sheen (at Steller Floors it is likely Satin), and a high-density, low-shed roller applier like this one, and a tray to use for the polyurethane & roller.
Why do I need to use sand paper?
In your DIY experience, you are likely familiar with paint for wall applications. For most uses, paint doesn't need to be strong because folks don't need to walk on it - so you don't often sand before painting.
Unlike paint, polyurethane needs to be very strong - and so it chemically cures to form strong bonds. And, when it cures, it needs something to physically bond to. When you abrade your flooring surface with 180 grit sand paper, you are creating very small scratches in the surface that the new coating will be able to physically adhere to as it cures. If you don't, your new coating might easily peel off.
How to Fix Light Scratches DIY
Now that you understand why you need sandpaper, you'll return to your project site and:
1) Read and follow the directions on your chosen polyurethane. Follow directions for temperature and humidity conditions and use recommended safety precautions including dust masks during sanding
2) Sanding Use 180 grit sandpaper to abrade the area of your project until the entire surface area of the project is an even, milky white color.
- Use enough elbow grease that you might break a sweat, but no need to sand so hard that you reveal the wood surface underneath - scratching the polyurethane is enough
- The new sanding area should exceed the project area by about an inch on all sides so that you can taper the thickness of the polyurethane as you reach the edge of the project area
- Vacuum or use a damp paper towel to clean up any excess dust
4) Apply polyurethane by using the roller to spread an even coat out over the sanded area
-
You'll find it pretty easy to spread water based polyurethane evenly, and you can expect materials to settle over a manageable project area easily - the larger the area, the more unmanageable it will tend to become
- allow to cure/ dry for the amount of time specified by the label
5) Clean up and store your materials in case you need to use them again in the future!
Enjoy Your Refreshed Floors! Plus, did you see when we drove a truck on our Steller Floors?
Ready to Get Started with Steller Floors? Get a Quote!